Storms and more

I was woken up this morning to the sound of chain saws outside my window. You may be thinking so why is this important – well it is important because we own all the property within LOUD chainsaw sounds. The local electric company decided that the woods was too close to the line. Surprise the woods have not moved since the lines have been there – over 40 years.

I have had problems with this before and one year they actually cut all my fruit trees  We immediately want out to talk with the men. They were very nice and told us that they had already been told not to touch the fruit trees or any garden structure and to make sure no physical damage occurred to said structures.

This is how they left our beautiful woods – July 2015 001The worst news is that it was too flooded for them to finish what they wanted to do and will be back. This is a double problem because the veterinarian has told us to keep Shoes inside when ever any one is working on trees since last year when they were trimming trees on the roadway both her eyes got red and swollen and had to be treated for two months before they healed. It also means that uninvited people will again be making themselves at home on private property.  But after reading and experiencing life  I am beginning to believe that there is no private property in America. We have all been lured into a false sense of independence where if truth be known we are slowly loosing many of our rights.

The good news is after two years of trying I have finally produced a green pepper. There are two peppers on six plants but that is better than last year.

July 2015 002

Blueberries  finally produced this year and I have lots of cherry tomatoes, Roma tomatoes, chives, basil, oregano , and zucchini.

July 2015 005Looking forward to some veggie burritos this evening!

Sharpening garden tools

I really had a hard time deciding on what to post today because there are so many topics that could be covered with today’s chore (play).

Doug left to go back to Ohio this morning which always leaves me a bit sad (every mother knows the joys of having all her kids home at the same time) and the best way for me to deal with it is to either go on a road trip or do some hard work. I chose the hard work today.

I have always loved the crisp edges in well-tended gardens but had never applied the technique to any of my gardens. The entry garden had really gotten out of hand quickly this time and when returning to the house I almost sipped on a lump of wet leaves which made me decide it was time to get a crisp edge to prevent this type of overgrowth.

May2015 131I never got around to sharpening the tools last winter and the garden tools were used by other household members and a few had been left outside of the garage. In other words they would not cut into the soil (I doubt if they would even cut butter at this point) so it was time to sharpen the ones that I needed for this project at least. A sharp tool is safer and makes the work go faster.

The first thing that needed to be done was to remove as much of the rust as possible using a wire brush or steel wool. Rust not only looks bad but it will pit the edge of the tool quickly.

May2015 142

Now, run your file around the top of the edge some, if needed, to smooth out any nicks in the blade.

May2015 133

Look closely at the edge and you can see some nicks on the top. Also note that this is the beveled edge – you file this side only !

This is the back side - do not file this side at an angle.

This is the back side – do not file this side at an angle.

Rule 1. Sharpen single-beveled tools ONLY on the beveled side. Brace your spade or shovel well and file it on the top, the beveled side. You can run your file up into the blade or down the blade, it does not matter as long as you are consistent.

Rule 2. In general, sharpen the bevel at the same angle that was already there.

Rule 3. If you no longer see a bevel than remember sharpening at a steep angle gives a more durable edge; sharpening at a low angle gives a sharper edge.

It usually works best to sharpen your spade at a fairly—high angle, one that puts a shine back only about 1/4 inch into the blade.

May2015 135

This shovel would not cut into a hosta plant to divide it before sharpening – now it slices though with on problem.

Use a mill bastard file to sharpen most tools with only ten or so strokes to create a sharpened edge. Run the file across the entire blade a while until you have created a shiny tapered edge. Now run a finger on the underside of the blade, from the inside out to the tip, you may be able to feel a slight burr (also called a wire or feather ) at the edge. This means you are getting a sharp edge and the finishing touch is to run the file lightly across the back side flat with the surface to remove these burrs.

Once the tools are sharpened it is easier to keep them that way if you simply clean them off after each use.

Once the dirt is removed – oil the metal part of the tool. Any oil from WD40 to cooking spray will work to help prevent the tool from rusting. In fact I prefer cooking oil for any tool used in the garden. Luckily square foot garden does not require many tools.

May2015 143

It is important to put all the tools away when you are finished and that includes your file.

May2015 144 I finished one side of the entry garden this afternoon.

May2015 137I had to divide the hosta and pull some more poison ivy. Hopefully I will get the other side done tomorrow and I will show the technique to get this edge, divide the hosta, and prevent getting poison ivy rash in the near future.

__________________________

Today’s organization challenge is to organize and safely store medicines

Catch Up

I am playing catch up today. Yesterday was a long day and  I never even turned on the computer. We were both completely wore out when we finally got home that once the animals were fed I want to bed.

We were working at KBC Apartments of Seymour. I was cleaning the kitchen when I found more damage that needed to be repaired.


Broken cabinet hinge

Broken cabinet hinge

I started to open this cabinet door and noticed that the hinge was broken. I had to remove the door from the cabinet to replace the hinges.

We decided to add a few ceiling fans which meant crawling around on the attic.


Bill covered in "attic" dirt

Bill covered in “attic” dirt

One good thing about having control of the camera – you will not see what I looked like! 🙂

Now that you have seen the “dirty” photo here are a few nice “clean” photos from the day before.

Shoes playing in her pool

Shoes playing in her pool


From the garden!

From the garden!

______________________

Yesterday’s  declutter challenge was to declutter and clean out the glove compartment of vehicles.

Stir-Fry Rice and Vegetables with Shrimp

Here is this weeks new recipe to enjoy as I work on the new gardens and today’s challenge which is to create files for inspiration projects from magazines and catalogs. This one is simple since I have been using  Pinterest  for inspiration and I already have a paper file set up for that purpose.

This week I took this :

Stir-Fry Rice and Vegetables with Shrimp 001 and some frozen popcorn shrimp and turned it into…………………

Stir-fry Rice and Vegetables with Shrimp.

Ingredients:

3 tablespoons olive oil

1 bunch green onions, white and green parts chopped separately

1 medium sweet potato, peeled, halved lengthwise and thinly sliced

1 small green bell pepper, cut into thin strays

2 carrots, thinly sliced

1 zucchini, thinly sliced

2 cups cooked brown rice

1 cup fresh mushrooms, sliced

1/4 cup honey

1/4 cup soy sauce

1 package frozen popcorn shrimp

Instruction:

Bake shrimp as directed on package.

Heat oil in wok over medium – high heat.  Stir-fry white parts of onions, sweet potato, bell pepper, carrots and zucchini until barely tender.  Add rice, mushrooms and green onion tops. Cook quickly until heated through. If necessary, add more oil.  Combine honey and soy sauce in cup.  Pour over mixture and stir. Add baked shrimp . Serve immediately.

Stir-Fry Rice and Vegetables with Shrimp 003

Makes 6 servings; calories around 370 per serving.

Things are  a bit different this week and I did the Friday’s chores yesterday  when I was washing the windows in the rooms that I have finished painting. I also polished all the wood doors and furniture with Old English Oil.

My Shade Garden Plans

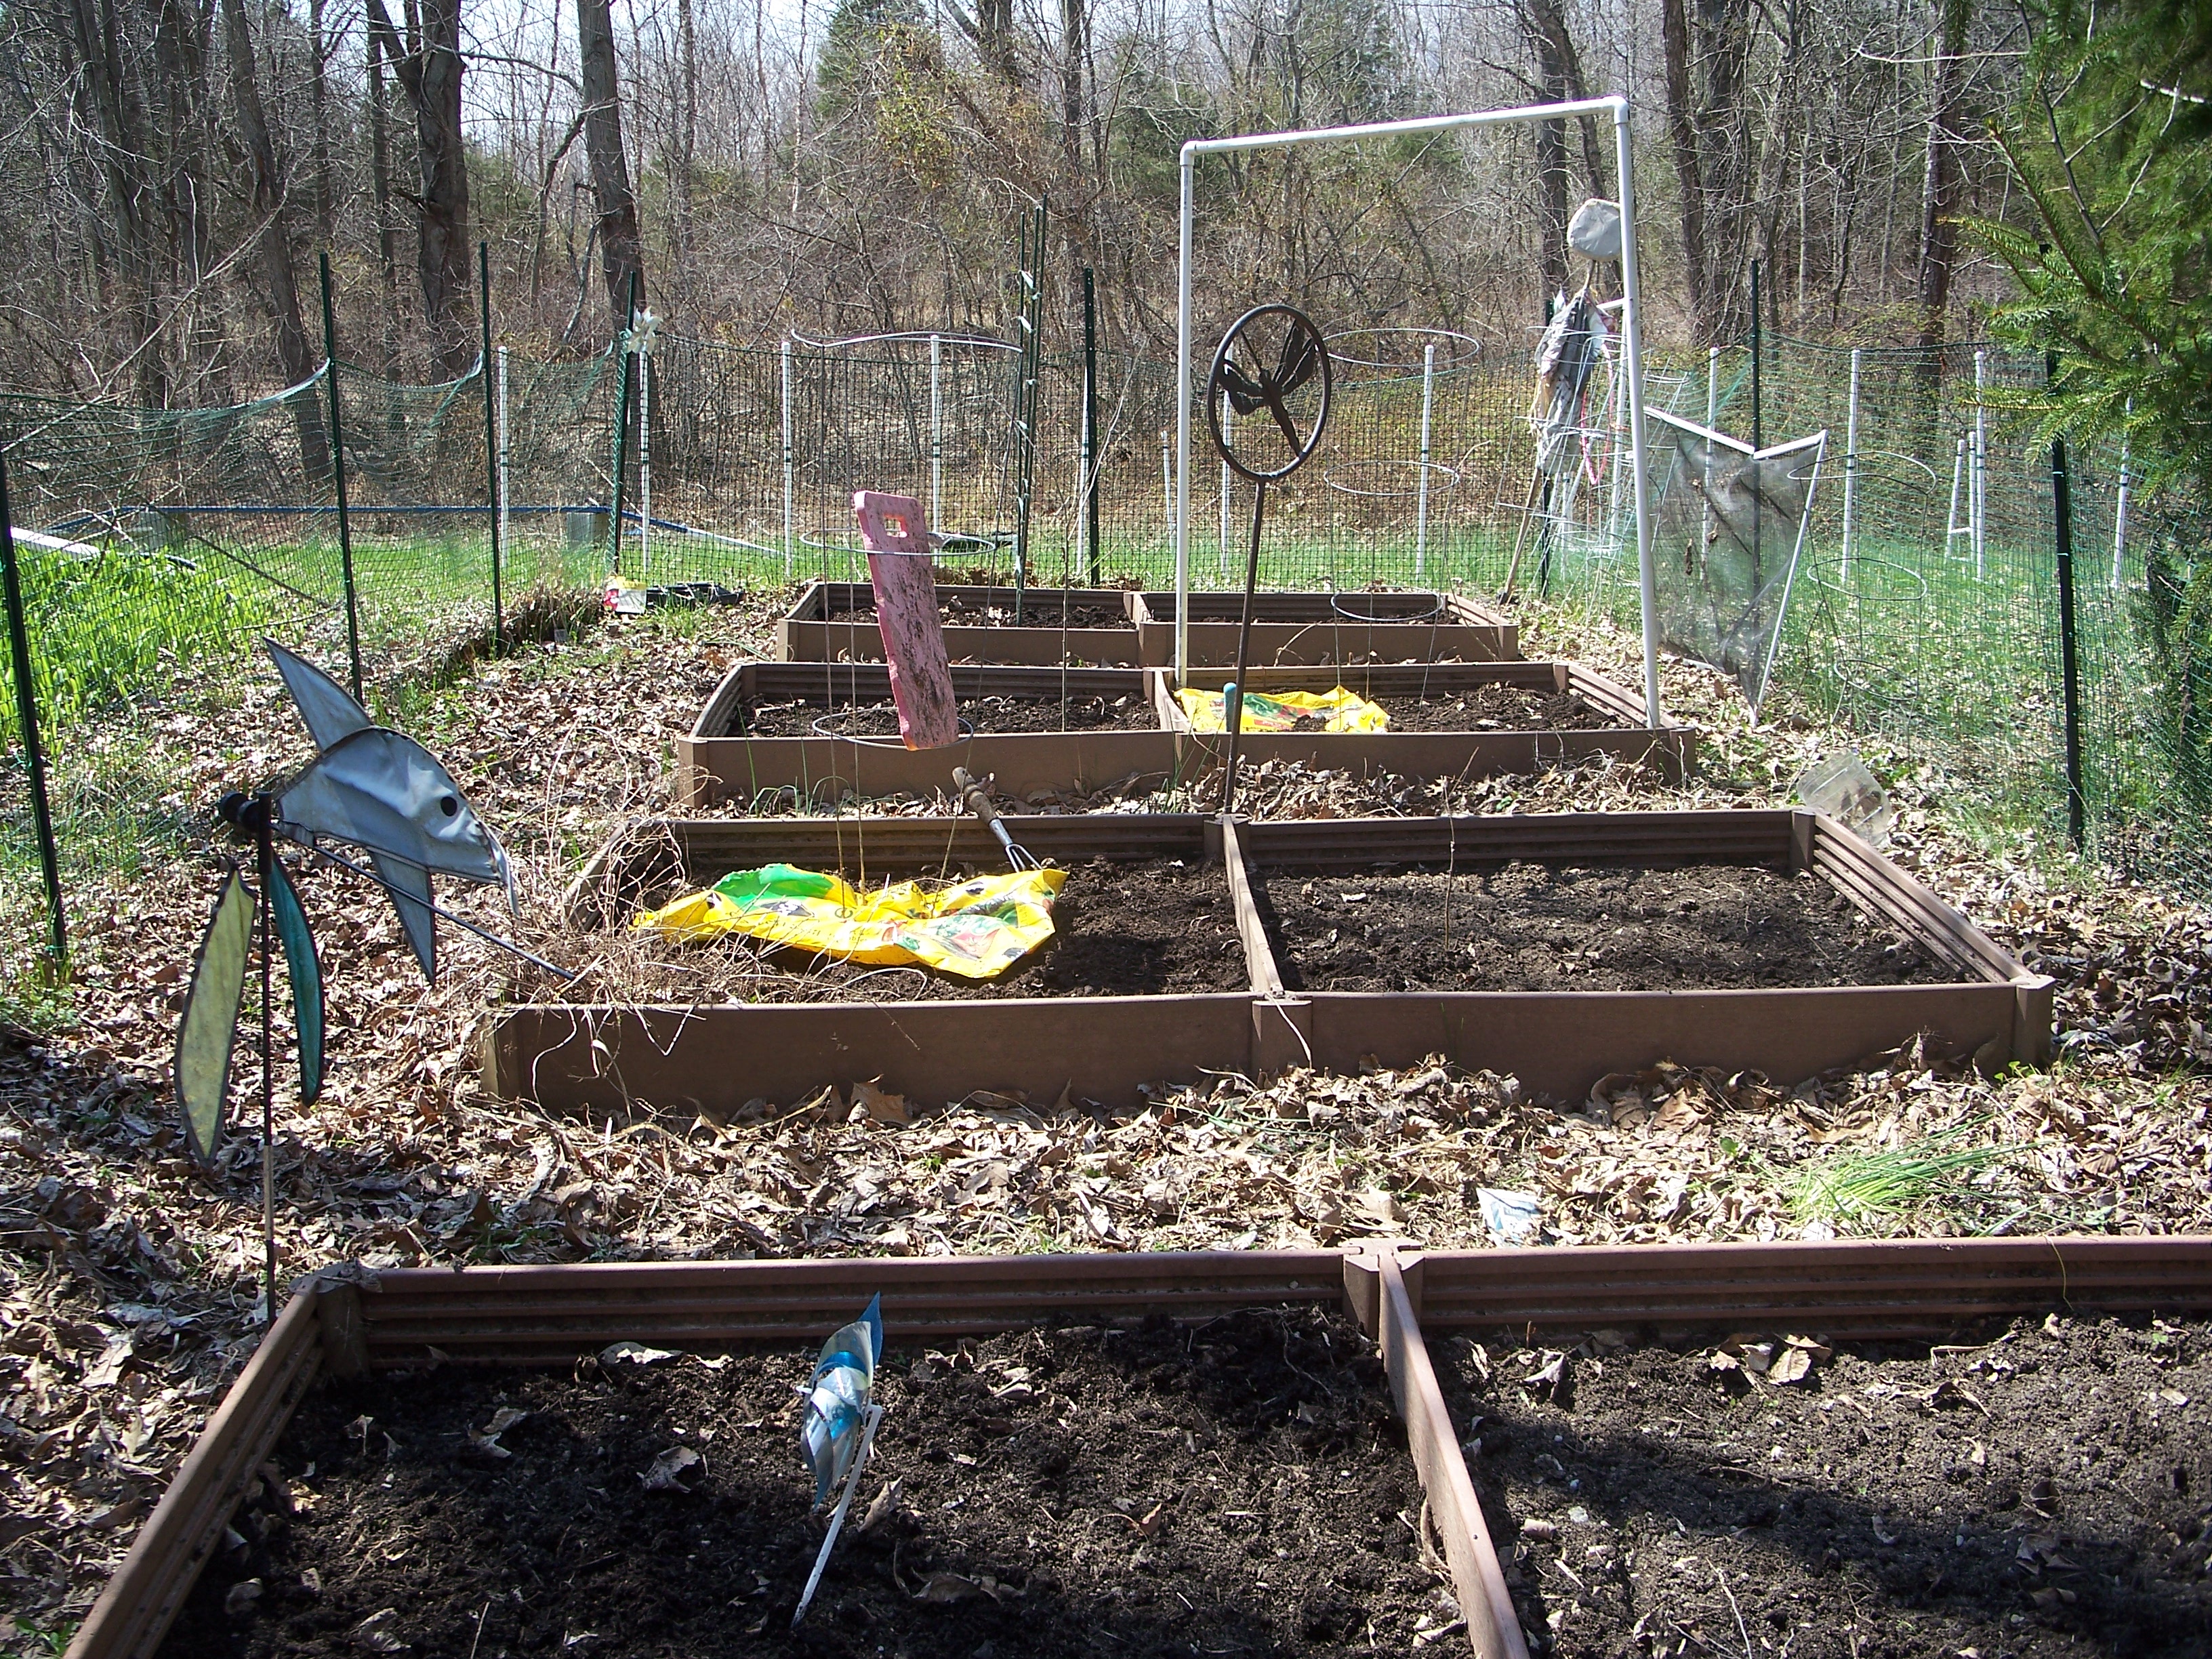
Yesterday I worked on the little garden in the shade. It consist of four raised beds (4 foot x 7 foot) with straw paths that measure two feet across. The complete garden is fenced in: however, as I was working one of my cats came inside to help. There was a hole in the fence that I had not seen – so  now I know how the rabbits got in to eat all my peas last year. (Thanks for showing me the hole, Sunshine!)

Shade garden

garden 001

I plan on four separate planting stages this year starting with early spring. I am off to a good start  (but later than usual) –  hopefully things will work out as planned.

I started the season by removing the winter cover of dry leaves. Once the leaves were gone I pulled any weeds that had emerged before adding a top-dressing of Miracle Grow garden soil. I used a small hand-held cultivator to break up the new soil before planting the seeds.

The garden gets more sun in the early spring because some of the trees have not leaved out yet. Later in the season the shade will be deeper.

After the seeds spout I will add grass clipping as mulch. We do not use any chemicals on our grass so it is very safe to recycle the clippings.

Early Spring plantings:

Bed A  is planted with two rows of Arugula directly in front of the garden gate (shown in purple on the drawing). The arugula seeds are planted one seed every 3 inches at 1/4 inch deep.  On the other side of the pin wheel I have planted two rows of spinach. I planted Bloomsdale, long-standing spinach seed every 2 inches and 1/2 inch deep. On the other side of the box I planted 3 rows of black seeded Simpson lettuce at a depth of 1/8 inch and spaced about 1 inch apart. Closer to the fence I planted 3 rows of early scarlet globe radishes.These are planted 1/2 inch deep and about 1 inch apart.  Plant new seeds every  two weeks for continuous harvest.

Arugula will be ready to harvest in 40 days. Outer leaves can be harvested as they mature.

Spinach  will be ready to harvest in 45 days. Plants may be used when they reach 3 inches in height.

Lettuce will be ready to harvest in 45 days. They can be used when plant reaches 4 to 6 inches tall.

Radishes will be ready for harvest in 23 days.

Bed B

The half bed in front of the gate was not planted today.  I will plant cabbage and broccoli plants later. The other side was planted  with 4 rows of dwarf blue curled vates Kale.  The seeds are planted every 3 inches and 1/4 inch deep.

Kale will be ready to harvest in 55 days.

Bed C

I planted sweet onion bulbs in the first box. They are planted 1 inch deep and 4 inches apart. These can be harvested as green onions or later after the top growth has fallen over as dry table onions.  I then planted one row of American flag leeks next to the box divider. The seeds are planted every 2 inches ans 1/2 inches deep. The other side of the box will be used later.

Leeks will be ready for harvest in 150 days.

Bed D

Both of the boxes are planted with dwarf little marvel peas with lettuce broadcasted in the second box. Two weeks from today I plan on broadcasting lettuce seeds in the first box. The peas are planted every 2 inches and 1 1/2 inch deep.

_______________________________

Late spring Planting

Bed A –  arugula, spinach, lettuce and radishes will continue to grow with the addition of beet seeds.

Bed B –  Cabbage and  broccoli plants will be added to the now empty side as will as some nasturtium seeds.  Kale will continue on the other side.

Bed C –  Onions and leeks will continue to grow  on the one side and green beans, lettuce,and radishes will be planted in the now empty plot.

Bed D – Peas and lettuce will continue to grow and more lettuce will be broadcasted as needed.

________________________________

Midsummer

Bed A – Lettuce, radishes, cover crop as needed

Bed B – cabbage, broccoli and Kale will continue to grow.

Bed C – Onions, leeks, green beans, lettuce, radish

Bed D – bush beans

____________________________

Autumn

Bed A – lettuce, carrots, spinach, arugula and parsley

Bed B – Turnips, broccoli, and Kale

Bed C – Lettuce, spinach, radish

Bed D – beets, carrots and leeks

___________________________________________

Today’s challenge is to  declutter duplicate and old catalogs. I do not keep catalogs unless I plan on ordering out of them. Most are treated like junk mail and immediately recycled.  I guess I will clean out some more magazines.

__________________________________________

It is starting to look like my weekend will be busy so today I am going to jump ahead and do Friday’s chores. I have decided to put off painting the treadmill room for now and work on the sun garden. The room will wait but the seeds only have so long of a growing season.

Making sense of Feng Shui.

I have been a student of Feng shui  for the last ten years. For those who are asking what is Feng shui. Feng shui (pronounced fung shway) is an ancient Chinese system of balancing our physical environment to promote harmony and a sense of well-being. I started by reading and studying a lot of books which was very confessing in the beginning. First of all there are three different schools  that fall under the same name – Feng shui – and even more schools that fall under these three categories.

  1. Traditional, or Classical Feng Shui Schools
  2. Black Sect Tantric Buddhism School (BTB)
  3. Intuitive/Modern School of Feng Shui.

The traditional is based on the Form, or Landscape school, as well as the Compass school. Form school examines the shapes and symbolism in one’s environment without referring to the compass directions.The Compass school schools utilize the Feng shui compass, the Lo Shu square, various feng shui calculations and, of course, the bagua.  Also the Compass school includes schools such as the Flying Star (Xuan Kong), the Eight Mansions (Ba Zhi), and others.

Black Sect Tantric Buddhism School (BTB) was developed in the US in mid-eighties by the Chinese Grandmaster Thomas Lin Yun. BTB school is a combination of Tibetan Buddhism, Taoism and Classical Feng Shui. The main difference between the Traditional Schools of Feng shui and the BTB School of Feng shui is the fact that the BTB School does not use the compass. The Bagua,or the energy map of the home, is laid very differently. No matter which compass direction the main door faces, the BTB Feng shui school bagua will always be placed in the same way, with the center of the facing wall  as you enter the house/room being considered as the Fame & Reputation area (which is  always South area in the Compass Feng shui school.)

Intuitive/Modern School of Feng Shui is the Western adaptation of some levels of Traditional Feng Shui and includes such schools as the Western School of Feng Shui, the Pyramid School, and others.

Most of what is written is a  combination of schools which makes it very confessing so before beginning your practice of Feng shui decide which method you wish to follow. All methods are respected but I find it easier to use the BTB school. The bagua is easy to remember and you do not need to carry a compass around.  When buying books or reading articles look for school method to see if it will work for you.

It is easy to begin decorating using Feng shui you can start with simple “cures” and build on them as time and money allow. I was lucky and the placement of our home was ideal; however the shape of the house wasn’t.  I had no knowledge of Feng shui when I designed our house which when examined with a bagua showed many missing life areas. The first thing I did was research how to cure the house. I added flower beds, trees, statues and a line of shrubs to “square up” the house.  Next I added things that enhanced each life area around our property.

I finally  started to work in the house itself with small things. The first step of true Feng shui is to clear the clutter which I could never do with everyone dumping off stuff, working full time, and then recovering from a hurt shoulder. I did the best I could by adding pictures,wind chimes , etc.

After hurting my shoulder back in 2008-2009  I could not do anything but read which meant a lot of studying and planning. I had a plan for each room but i needed to heal and to talk my family into letting me loose with a paintbrush and my ideas. That time has come!  The rooms that I have finished are balanced and fresh. There are a few things I still want to do to some of the rooms but they are just little things that will take time to finish. Some furniture pieces are in temporary places waiting for their true rooms to be cleared and painted. To see the different rooms go to the menu circle and click on it and a drop menu will appear – click on anyone of the topics to view.

Now I need to finish the regular Friday clean up –  I have found that without all the clutter it is easy to do a quick nightly straightening up process but on Friday’s I try to clean out the refrigerator, check the pantry for foods that need to be used, make a food menu list for the next week and a matching shopping list, water plants, clean and treat fish tank, dust the furniture and put anything that is out of place away, clean bathrooms, change sheets, mop and vacuum the floors.

Also it looks like it will be a beautiful day so after I finish painting another bedroom wall I just may get  those closet doors varnished. There was a change of plans  I started taking the bunk beds down yesterday because there was not enough room to move the ladder around with them in the room. I will be storing the frames in the attic.