Spring and Fall Cleaning Schedules

organized-home-challenge-ad-button-2

Today we finish the cleaning schedules by making a list for both spring and fall cleaning.

Click on the highlighted link to see my schedule.

Spring Schedule

Fall Schedule


Bill left very early this morning to go to Indianapolis for a class and will not be home until around six tonight. Chris had a meeting at 2 this afternoon so I had plenty of time to work.

I unloaded the truck and built another raised bed. I had to take five blocks from the last bed because I really needed to finish this bed today for the blueberry plants. I mixed peat moss and topsoil blend together and filled the new bed before planting the new blueberry bush. I had talked with Bill yesterday about moving the two old plants to this new location and he agreed that it probably was a good idea since they were not doing too well in their present location.  I transplanted them into the new bed and watered them well before adding weed control fabric on top of the soil. This is to control weeds and hold water in the bed. I added two water bottles between the plants to help water the plants. I will pick up some wood chip mulch the next time I get to town to cover the weed block fabric.

Photo by Kathryn L. Jarvis  on 4/30/14

Photo by Kathryn L. Jarvis on 4/30/14

It turns out that all three of the old bushes have some green growth on them  but very little. We plant these three a few years ago and we knew nothing about blueberries back then.  They were an impulse buy and we just struck them into the ground without any regard to what conditions the plants needed – the soil was rocky, hard and they were in the shade. I hope they do better in this bed.

There has been another change to the sun garden. The blueberry bed is where the cold frames were originally designed to go. The two beds in front of this bed will be used as cold frames when needed.

I then emptied the outdoor trash cans and placed the garbage bags  in the truck bed so I can take them away on my next trip to town. I  finished the outside work by weeding the  flower gardens by the back porch.  I found the oil to use on the door hinges while working in the garage which means I will not be waking people up anymore when I open doors during the night.

Now to wash these dirty clothes – no one said gardening was clean work.

Make a Cleaning Checklist

Today is your lucky day!  You get six new pages and two post.  I had this post ready for the proof-reading yesterday when my phone alarm went off telling me I had to leave for town. I clicked on save and got ready to leave. Now going to town isn’t a quick trip for me because it takes me at least 30 minutes to get there – longer if I get behind farm equipment, have to wait on trains, or animals. Yes, chickens do cross the road as well as deers and occasionally cows.

I try to get as many errands ran as possible when I do go to town, So after getting my hair cut nice and shorter than usual (easier to check for ticks) and picking up my hair conditioner at Christy’s Stylin’ Studio

Hair by Christy's Stylin' Studio

Hair by Christy’s Stylin’ Salon

I visited a friend that works in the same building  who gave me a new CD (God’s Favorite Child by Dr Steve McVey), I have never heard this person before so I am looking forward to listening to the CD. I than stopped in at the apartment building to see how much progress Bill had made on the drywall. I also wanted to see if he could take a break and go to Home Depot with me to help load cement block. He was up on the ladder and very busy  and said that he would prefer to keep working and that he did not want to “take someone’s job” away from them by loading up my truck.

So off I went – next stop was at St Francis Pet Hospital to pick up Shoes yearly supply of Trifexis. They have a great deal going this month I saved $63.75 on a year supply  plus they gave me a code number to get a $50 rebate on top of that. All I had to do is go home and print off the rebate form after entering my code,

I saw my aunt walking her dog so I stopped and talked with her before heading  to Home Depot.  Home Depot was interesting. My first stop was the bathroom where I ran into a lady cleaning blood out of her head. She had been hit in the head with some lumber. I talked with her for a while to make should she was okay and had someone with her before scouting the store to see how much I wanted to buy and to map out the best way to get everything.

Usually they have a stack of cement blocks out front  but not yesterday – I would have to get them from the very back and push the cart through the store. Anybody working here??  Not a worker in sight so I load up twelve block and push the cart to the opposite end of the store. One lady salesperson asked if I found what I needed but did not offer to help push the cart. I added the peat moss and soil to the cart and then pushed it to the check out counter. Another lady checked me out and never asked if I needed help loading the stuff – but she did ask about Bill. I then asked her about getting help and was told she would try to find some one but it my take a while. I pushed the cart across the parking lot and started unloading. Half way though Bill called and wanted to go to lunch he was surprised that I could not get any help loading. As I was talking  one of the workers came out to pick up carts and he saw me trying to load and talk at the same time and finished loading my truck.

I headed back to the apartment building and we than went to eat before I headed back home. By the time I got home it was raining so the truck did not get unloaded. I decided to print out the rebate form before I forgot about it – this meant I would have to fire up the desk top computer which I do not use much anymore.  Spoiled by the notebook.  I started this around 5:00 thinking it would be a simple thing to do. I had no problem until I got to the create the form stage The form was created on a different Adobe reader version which meant I had to update my version – simple right. My internet speed was not fast yesterday and  the poor computer was trying to download all updates, scan itself and download the new version of reader all at the same time – lets just say that I finally got the form printed out at 1:30 this morning.

So here is the post that was supposed to have been published last night:

I have been decluttering my house with the help of this website.         organized-home-challenge-ad-button-2

Today it suggest that I make a cleaning checklist for my home to place in a household notebook. The site  allows you to download  cleaning schedules after you “like” their Facebook page.

There are daily cleaning, weekly, kitchen, bathroom, bedroom, spring, and fall cleaning schedules and the  schedules are printable.

I have personalized my cleaning schedule, using a combination of the suggested chores plus my own chores that I have to get finished.

I have made a separate page for each schedule.

Click on the colored link to see my schedule.

Daily schedule

Weekly schedule

Monthly

Quarterly


Feng Shui in the Master bed

Last Monday I explored the one of the three most important parts of  any house: the front door. The second most important feature is the master bed.

The bed not only determines your ability to get a good night’s rest, it effects your relationship and your health, but also influences your financial success. How? the quality of your sleep and your health effects your ability to perform well at your job.

The master bedroom nourishes the adult energy so it is a very important room, Feng shui principles that should be applied to the master bedroom will work in your other bedrooms as well.

One of the first things that you should  do is place your bed in what is called the commanding position. Remember to always handle the bed  gently and respectfully when moving it to a new position.

There are four parts to the commanding position of your bed:

  1. The bed should sit as far from the bedroom door as possible.
  2. The bed should be positioned to allow the sleeper to be able to see the widest possible area of the room. Do not place the bed up against a wall.
  3. The sleeper should be able to clearly see the bedroom door from the bed.
  4. The bed should not be in direct line with the door.

If you can not move your bed to a commanding position then you can use a few cures. Try to use as many cures as you can  without over whelming yourself.

  • Position  your bed against a solid wall. I mean the bed should physically touch the wall.  A window or door behind your bed you should cover them with drapes that match the wall coloring.
  • If the direct path of any door runs across your bed then hang a metal wind chime halfway between the bed and the door.
  •  Always do a cure if your bed is in the coffin position – the bed is positioned so that your head or feet point straight out the door by hanging a faceted crystal sphere over the foot of the bed between the door and the sleeper.
  •  To cure an exterior door place a wind chime inside by the door.
  • Use a mirror across from the sleeper  so that  they can see the doorway from there bed.
  • Tie a bright red tassel from the door knobs on the side of the doors that hit each other when they are opened
  • Slanted ceilings or overhead beams can be cured by hanging a faceted crystal from them. Remember to use a red cord cut to a multiple of 9 inches in length.
  • It is always best to sleep on a new bed – one that no one has slept on before.  No used mattress or box springs. If you must use a used bed then you should perform the citrus water blessing ceremony to renew the bed’s energy.  You should get a completely new bed if the person you shared the bed with dies, the relationship ends, there has been a major illness by one of the bed partners, you move to a new home, you get married or your bed is stolen. If you can not afford a new frame then get a new mattress set at least.
  • Stay  away from king-size beds.
  • Do not store things under the bed.
  • Do not get super high or low beds
  • Use wooden frame bed  not metal ones.
  • Headboard should not include bookshelves.
  •  There should be nothing above the mattress at the foot of your bed.
  • Beds that fold up in any way are not recommend.
  • No water-bed.

You should use a strong solid headboard and  use color to your advantage (pink and peach for attracting love, red for passion, green for health, and yellow for healing).

organized-home-challenge-ad-button-2

Read Organized Home Challenge #17: Cleaning Schedule


Blueberry Plants

Blueberry bush

“Image courtesy of Rosemary Ratcliff / FreeDigitalPhotos.net”.

Sundays always seem to make me sleepy.  I don’t really know why but as far back as I can remember I fall asleep on Sunday afternoons. Sometimes it is just a few minutes but today I can’t seem to get motivated to get any work finished. We did stop and got groceries on the way home from church and had lunch before I fell asleep so I did get a few things done today.

Chris and I unloaded my truck which was loaded with more cement block for the sun garden. It was too dark to unload it last night when we got home.  I have decided to widen the paths between the raised garden beds. The original plan called for 2 foot paths and a four-foot center path but I have plenty of space to spread out so my paths are going to be close to 5 foot wide. This allows easy access to the beds with wheel barrel, carts, and I will be able to mow between the beds with my riding mower. This will cut down on the cost because I will not have to buy stepping-stones to place between the beds.

I also need to plant the new blueberry plant which was given to my husband as one of his retirement gifts on Friday afternoon.  I measured out the new design of the garden yesterday so I would know where to plant the bush. It will go on the north side of the cold frames which are not scheduled to be built until later this summer. We have two small blueberry plants that are not doing well in their current place so I may move them all to the new location as well as buy another plant. I need to get more cement block to complete the bed for the blueberries and the peat moss and soil so the plant will get some water but will not get planted until later this week.

Sunday are usually my “do nothing” days. I spend the day deciding what projects to work on during the upcoming week and enjoying time with my family. Sometimes I have to play “catch-up” and finish a few things – like unload blocks and make plans for a bush.

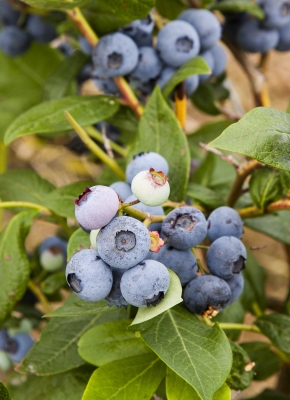
Which brings me to today topic: blueberries.

Blueberries are a woody bush that are resistant to most pest and diseases. They come in three varieties (highbush, lowbush and hybrid half-high) that can produce blueberries for up to twenty years The bush will also produces white spring flowers and have scarlet fall foliage. They are hardy i zones 3,4,5,6, and 7.

Highbushes are around six-foot high and were adapted for zone 4 to 7.  Lowbushes are best for coldest climates as the are for zone 3 to 7.  They are about a foot high and creep across the ground. The hybrid half-high grow to around 18 to 48 inches high.

It is best to plant one to three-year old bushes in early spring in full sun.  They need a hole 18 inches wide and 20 inches deep and spaced from 2.5 to 5 feet apart. The main thing to know is that they are very picky about the soil. It needs to be acidic, high in  organic matter, moist but well-drained. The ph should be between 4 and 5. Do not apply fertilizer at time of planing but wait one month than fertilize the plants. They should be planted in pairs because the need to be pollinated to produce fruit.

A 4 x 8 foot raised bed works well for 4 to 5 blueberry bushes. Mix a 4 cubic foot compressed bag of peat moss with equal amounts of acid compost of planting mix. If planting directly in the ground dig a hole about 25 wide and a foot deep, remove half the soil and mix with equal amounts of peat moss.

To plant a container plants, remove the container and roughen up the soil around the roots. Set the plant into the prepared hole with the soil line of the plant about 1  to 2 inches higher than the existing ground and firm the soil around the plant. Mound the soil up around the sides of the exposed roots and water well. If planting bare root plants spread roots out wide and shallow and cover with 1/2 inch soil. water well.


Once planted you can  not just walk off because they need additional care. The bushes need at least 2 – 4 inches of mulch to protect their shallow root system and  one to two inches of water every week.

Remove all blooms for the first year. After the leaves drop remove low growth around the base of the plant that did not grow upward. Remove dead wood leaving bright-colored wood. Remove blotchy colored short pieces. Aim for removing no more than 1/3 to 1/2 of the plant’s wood each year.  This should be done in late winter before spring growth.

It is best not to allow the plant to produce fruit until the second  year so that the plant grows faster and bigger. Netting should be placed over bushes that are producing fruit to keep birds from eating the berries.

Blueberries should be protected from birds, blueberry maggots and blueberry mildew.

Blueberries are usually harvest in late July to mid August the bush will not be in full production until it is around six years old.

organized-home-challenge-ad-button-2

Declutter and organize cords and wires. This was done about four years ago when the puppy almost killed herself chewing on an electrical cord. Luck for us and her that it was attached to a GFCI electrical outlet.


Topsy-Turvy Planter

I made this in one afternoon.

Planter

Photo by Kathryn L. Jarvis

One planter is missing in this picture but it has been replaced now.

This project was inspired by a post on Pinterest. The original  post called for a shallow bowl on top of the upper pot to act as a bird bath. I did not want to encourage birds near my herbs so I omitted the bowl on top. Each pot as a different herb growing in it.

The pots  can be painted a different color which I may do with larger pots in the future. 

The directions call for 1 – 8 ” pot, 4 – 6 ” pots and 1 – 4″ pot and a re-bar of 62″. If I make another one I will use bigger pots. The planter I made has to be watered daily and at times twice a day even when it is placed in the shade. The herb planted in the bottom pot grew nicely but the other struggled to grow and the top one had to be replaced many times last year. This year I plan on placing artificial flowers in the top pot and herbs in all the others. The 4′ pot is just too small for any herb.

. Directions:

  • 1  8″ tall terracotta pot for the base
  • 4  6″ tall pots
  • 1  4″-5″ tall pot
  • 62 inch piece of re bar (I had a 10 ft piece left over from another project and I cut it to size with a hacksaw.)

If you decide to paint the flower pots you will need

  • Spray paint primer. You may need two cans.
  • Gloss Finish Spray paint in your color choice.

Step 1: Prime all of your pots and then spray paint them in whichever color you choose.

Step 2: Measure the height of all of your pots and then add 24 inches to that number to determine the length of your re-bar. Using a hacksaw cut your re-bar to size. Pound the re-bar into the ground with a hammer so that at least two feet is in the ground so that it will hold your heavy pots.

Step 3: Thread the re-bar though the hole in the bottom of your pots and fill with soil. Alternately tilt each pot from right to left, filling with soil as you go.

Step 4: Plant your flowers and enjoy!

 This was Bill’s first day of retirement and he spent it working on drywall at the apartment building, I mowed all the grass around the house (3 acres), cleaned the house, did laundry, cleaned the porches, and made some changes to the sun garden.

organized-home-challenge-ad-button-2

 Declutter in/out box on your desk. I had no problem with this because I clean these out daily.

High Fiber Vegetable Soup

I love soup – not the canned stuff – but real soup that has been simmering on the back burner and is full of rich favors. It is filling and full of nutrients so I am always looking for new soup recipes.

This vegetarian recipe makes 12 servings which freezes well and is good reheated as left overs.

High fiber vegetable soup 001

Photo by Kathryn L. Jarvis

Ingredients:

2 cups chopped bell pepper ( green peppers are cheaper)

2 cups chopped onion

2 tablespoons olive oil

6 cups water

4 cups vegetable broth

4 cups tomatoes

2 tablespoons lemon juice

2 cups diced carrots

1 cup corn

2 cups green beans

1 cup chopped cabbage

2 cups chopped celery

1 cup diced yellow squash

1 large potato, diced

1 bay leaf

2 teaspoons marjoram

1 teaspoon thyme

1/2 teaspoon black pepper

1/4 teaspoon crushed red pepper

1/2 cup minced parsley

1 cup pearl barley

In a large pot, saute bell pepper and onion in oil for about 2 to 3 minutes. Add water, broth, tomatoes, lemon juice, all vegetables and all spices.  Bring to a low boil, reduce to simmer. Cover and simmer for 20 minutes. Add barley and simmer 40 to 60 minutes longer. Remove bay leaf before serving.

Note: I used a package of frozen green beans,carrots,celery and corn mixture in this recipe.

Calories – 247

High fiber vegetable soup

Photo by Kathryn L. Jarvis

Usually I do chores on Friday but today was spent at my husband’s Retirement party  We had a wonderful time and I really appreciate all the work that went into the event. Thanks every one especially Dee.

Bill's Retirement Party 021


organized-home-challenge-ad-button-2

De-clutter old computer and printer equipment. I have done very well with this one because not to long ago I had seven computers and six printers.  At the moment I still have four computers and five printers not counting notebooks, laptops and readers. All but one computer and printer are being used – however I plan on slowly replacing the desktop computers with laptops. One thing that was keeping me from getting rid of the computers was that I was afraid that the information on them would fall into the wrong hands. I did a little research (have you noticed I do lots of research) and discovered that I should remove the hard drive from the tower before  recycling the computer. The hard drive can then be saved or better yet smashed either way your personal information is not unprotected.

Ticks

Well it is that time of year. I have been outside a lot this week and today after lunch I was talking with Bill when I casually ran my hand though my hair. Oops . what did I feel? The first tick of the season had attached itself to the middle of my head. I gently removed it and was happy to see a very thin tick with a bit of skin attached to its mouth. I was not home at the time but washed the area and applied alcohol to the area as soon as I walked into the door.

So what should you do if you are a victim of a tick bite?

  • Determine if the tick has a head by observing it closely. There are two groups of ticks: those with heads are called hard ticks, and those without heads are called soft ticks.  The soft ticks generally do not transmit diseases to animals or humans.
  • Determine the size of the tick. If the tick is a small as a speck of black pepper with black legs it is most likely a deer tick which can spread Lyme disease.

https://i0.wp.com/upload.wikimedia.org/wikipedia/commons/6/62/Deer_tick_Ixodes_scapularis.jpg

  • The American dog tick can be 1/8 to 1/2 inch wide depending on how much blood it has withdrawn from its host. The rear of the American dog tick appears to be made up of small squares and the body has silver-white markings on it.  A silver spot behind the head of a tick indicates it is a female American dog tick. This tick is also called a wood tick and often carries Rocky Mountain spotted fever, tularemia and ehrlichiosis.

File:American Dog Tick metric.jpg

Male

female wood tick female

  • Check the tick for any markings on its body. One or more distinctive white speck on back of a light brown body or ticks have striping   is the tropical markings of a long star tick, which can carry tularemia, Rocky Mountain spotted fever and southern tick associated rash infection (STAR).

amblyommaamericanumtick_0

  • Next check out the mouth of the tick. The deer tick has a long narrow mouth and the dog tick has a thick short mouth.

How to remove a tick:

First it is important to remove the tick as quickly as possible. The longer it is on you the more likely it will transmit a disease or infection to you.

Use tweezers or  special instruments that are designed specifically for tick removal and grab the tick as close to your skin as possible. Do not crush the tick as this will force the tick’s stomach content into  your bite. Next apply steady pressure and gingerly pull upward on the tick. Take care not to twist the tick  or yank it quickly, as this can leave the mouth parts still lingering in the bite site. Pull steadily until the tick becomes unattached.

Wash the affected region where the tick bit you with warm water and soap and apply an antiseptic.

Check the bite area if it is not at all red or swollen, the tick was probably not attached long enough to leave any poisonous substance; but, If it is red and puffy, it may be infected. You should seek medical attention for any tick bite to be on the safe side but especially if it shows signs of infection or develop flu-like symptoms.

I always keep the tick in a plastic bag or bottle  with rubbing alcohol to help preserve it and labeled with the date I removed it. That way if an infection accords I can take the tick with me to the doctor’s office.

Remember to keep the grass cut short, use tick prevention on yourself and your pets and always check for ticks when you come inside.

This is a picture of my hitchhiker:

tick 010 (2)c

Photo by Kathryn L. Jarvis

organized-home-challenge-ad-button-2

Clear off home office desk top.

I have to admit this one is hard to keep up with. I always have research  going on and I hate closing all the books up when I am in the middle of something so the study desk which is a huge desk is always covered. It doesn’t help that I like to be around things that made me feel happy and I display them on that desk – so even when I have the desk cleaned up it is never clear. (Computers, printers, pen and pencil holder, and phone are allowed the goal should be to only have things on your desktop that you use daily ). The note/letter writing desk in the dinning room is always clear since it is a drop leaf desk and I have to clear it off to shut the leaf. Chris’ desk is always clear and the business desk is cleared most days.

Golf Anyone? yes

I took the day off  just to have some “fun in the sun.” Bill was finished with the drywall machine so we returned it to our friend. He and his wife invited us out to play a round golf .

I have to admit I was a bit apprehensive about picking up a golf club since it has been at least 15 years since I have played. We played nine holes on a small course close to their house and the day was perfect for golf.

I only lost one ball on the last hole when it decided to take a bath. Bill lost three balls and I never noticed how many Rick lost but I am sure it was at least three (they also took baths). I kept score  (53), Bill never kept score and Rick never added his up but according to Sheila I kicked their rear ends.

The main thing was that I really enjoyed the game today which is a big switch.  Usually Bill is very serious when he plays which takes all the fun out of the game but today he was very relaxed and happy. I told him if he would play like that all the time I would actually go play more often.

A trip to Indianapolis is not complete without stopping in the see Grandma.  We visited with her for a few hours before heading back home.

I remembered to stop at Pecto to get Shoes her Dental Works for her water.

736990000118E

I usually do not recommend products  but this stuff is great. Two years ago the vet recommended I schedule a dental scraping for Shoes. She was only two at the time but her teeth were brown and covered with tartar even with daily brushing.  A friend told me about Dental Works and I decided to give it a try. The next visit to the vet found her teeth a nice pearly white and no dental scraping was needed. I still brush her teeth once a week and she gets to chew on a dental ball filled with Nutri-Vet Dental Gel every other day. She loves the taste and hopefully her teeth will remain clean.

99940-0_1___17577.1293562431.352.322

organized-home-challenge-ad-button-2

De – clutter home office desk drawers. I really need  to get some trays to fit inside the drawers to help keep things in place because this is a monthly chore.

Homemade Fruit tree sprays

We have always had at least one fruit tree and every year I say I am going to spray them. I never do! I always have a “good” reason – I missed the “correct” time for spraying, I can not find the right stuff to spray them with, the stuff I do find is toxic to other plants or animals, etc. The final results is that half the crop is eaten by birds and the rest by insects leaving us with very little. This year is different thanks to a little research.  I have found many recipes for homemade fruit tree sprays. The best part is that they are non toxic and can be applied to the trees anytime and right up to harvest time. This will be the first year I have tried the homemade sprays so I don’t know if they work.  I will find out this fall – but anything should be better than doing nothing at all.  I decided to use a homemade spray developed by an organic horticulturist gardener named Howard Garrett called Wash-Away-Fungus Spray.
1-2 cups of compost tea (Optional if you don’t have any compost which is completely finished) (If you are spraying edible plants or fruit, do not use tea made from manure compost)

1 tablespoon liquid seaweed ( the site said it could be found in plant nurseries but so far i have only found it on the internet.)

1 tablespoon “fancy” molasses or black-strap molasses from the grocery store.

1 tablespoon apple cider vinegar

1 tablespoon Murphy soap. I found other recipes that called for pure dish washing soap, such as Dawn.

1 galleon water

1 – 11/2 tablespoons baking soda, optional

1/4 cup garlic tea, optional

a pump sprayer

I found it was easier to mix everything together in a glass of hot water before adding it to the sprayer. Once all the ingredients are dissolved I poured the mixture into the sprayer and then added cool water to the fill line. I used a one gallon pump sprayer. Spray the trees with a light mist early in the morning. This should be repeated on a regular schedule during the summer right up to harvest if needed. I plan on spraying every two weeks. I am not using the compost tea because I do not have any complete compost at this time. I have not been able to find liquid seaweed at any of out local stores so it was not included in the first spraying. I also used Dawn (blue) dish washing liquid instead of Murphy soap. I did not include the baking soda or garlic in the first spray because the bees are busy pollinating the flowers and did not want to kill them or chase them away. I mainly sprayed the tree trunk, branches and leaves this time. Another recipe that I found was Homemade Organic Pesticide for fruit trees. One cup of vegetable or canola oil is mixed in one gallon of water. One tablespoon of pure cinnamon oil is mixed into the water and vegetable oil mix. Two tablespoons of cayenne or chili pepper powder is steeped in one cup of hot water for 24 hours. Strain the solids from the liquid through a cheesecloth or heavy paper towel, then add the liquid to the main mixture. Add two tablespoons of garlic powder and one cup of hot water, stirred occasionally, steeps for 12 to 24 hours to make a garlic tea. The solids are strained from the liquid by pouring the tea through a cheesecloth or thick paper towel. The remaining liquid is then added to the mixture. One-quarter cup of any kind of liquid dish detergent is added to the mixture and stirred gently. Place all in a pump sprayer. Spray every two weeks or after a heavy rain in the morning during the growing season. Note: When spraying it is best to make sure that the wind is still and wear eye protection. Please note that these recipes were not created by me.

52 Week Organized Home Challenge

Week 16: Home office organization (April 21, 2014) Today you are asked to declutter home office desk drawers.  It  seems I just did this but they need it again.

Outdoors is calling my name!

I love this time of year but I do get a bit overwhelmed by all the  things that needs to be done. Gardens need to be planted, grass needs to be mowed and I always find more projects to do.

I have decided to put the indoor painting on hold for a while. I still have the master bedroom and walk in closet  to finish in the south wing and all of the north wing to paint but these can wait for rainy days or those super hot days which will soon be here.

Yesterday I finished cutting the grass and noticed that the parts I mowed Friday look like they need mowing again.  I also trimmed tree limbs that had broken during the winter and any limbs that hit me in the face while mowing. Chris had picked up branches for me so I could mow so now I have two piles of brush to get rid of. Today I cut the grass at the farm which took me two hours now all that is left to cut this week is the grass at the apartment building.

The shade garden is just starting to sprout  so I need to add some mulch between the plants.

Garden 2017

I have one raised bed built in the sun garden and want to town to get 10 more blocks  for the next one (each takes 18 blocks). These will not be planted until early May when the frost danger is over. I plan on adding beds all summer until all are finished.  I will add the soil next spring on the other beds – they will  be covered with plastic this summer to help kill the grass.  The bags of soil in the first two will be opened when I get ready to plant the plants.

Garden 2019

I also pruned out all the dead limbs from my three lilac bushes. They are in full bloom and I could not resist picking a few for the kitchen table.

I also mixed up a homemade fruit tree spray and sprayed all the fruit trees. This is the first year I have sprayed the trees so hopefully we will have insect free fruit to eat this fall.

I have been putting off finishing a project that I started  in October  2012. I was working on a paving stone patio by the back door when Bill had a mini stroke, We were planning on finishing that project that weekend.  I had not worked on the area since. The other day he said i should not have started the project if I wasn’t going to finish it. So after mowing the grass I moved four wheel barrel full of dirt and still have 1/3 of the area to dig out before adding the sand.

Garden 2016

The challenge for today according the web site (52 Weeks to and Organized Home) is to continue to declutter the home office supplies.

52 Week Organized Home Challenge